第二章 微服务环境搭建
閱讀本文約花費: 5 (分鐘)
本次是使用的电商项目中的商品、订单、用户为案例进行讲解。本章只是搭建基本环境,并不过多讲解.
2.1 案例准备
2.1.1 技术选型
maven:3.6.0
数据库:MySQL 5.7
持久层: SpingData Jpa
其他: SpringCloud Alibaba 技术栈
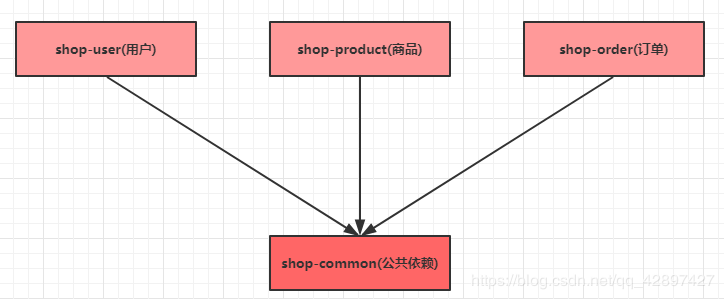
2.1.2 模块设计
下面是项目端口号说明及项目结构
springcloud-alibaba 父工程
shop-common公共模块【实体类】
shop-user用户微服务 【端口: 807x】
shop-product商品微服务 【端口: 808x】
shop-order订单微服务 【端口: 809x】
2.1.3 微服务调用
在微服务架构中,最常见的场景就是微服务之间的相互调用。我们以电商系统中常见的用户下单为例来演示微服务的调用:客户向订单微服务发起一个下单的请求,在进行保存订单之前需要调用商品微服务查询商品的信息。
我们一般把服务的主动调用方称为服务消费者,把服务的被调用方称为服务提供者。
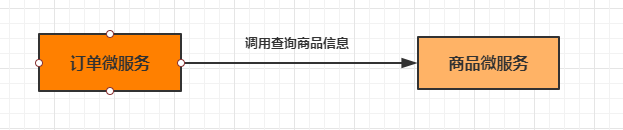
在这种场景下,订单微服务就是一个服务消费者, 商品微服务就是一个服务提供者。
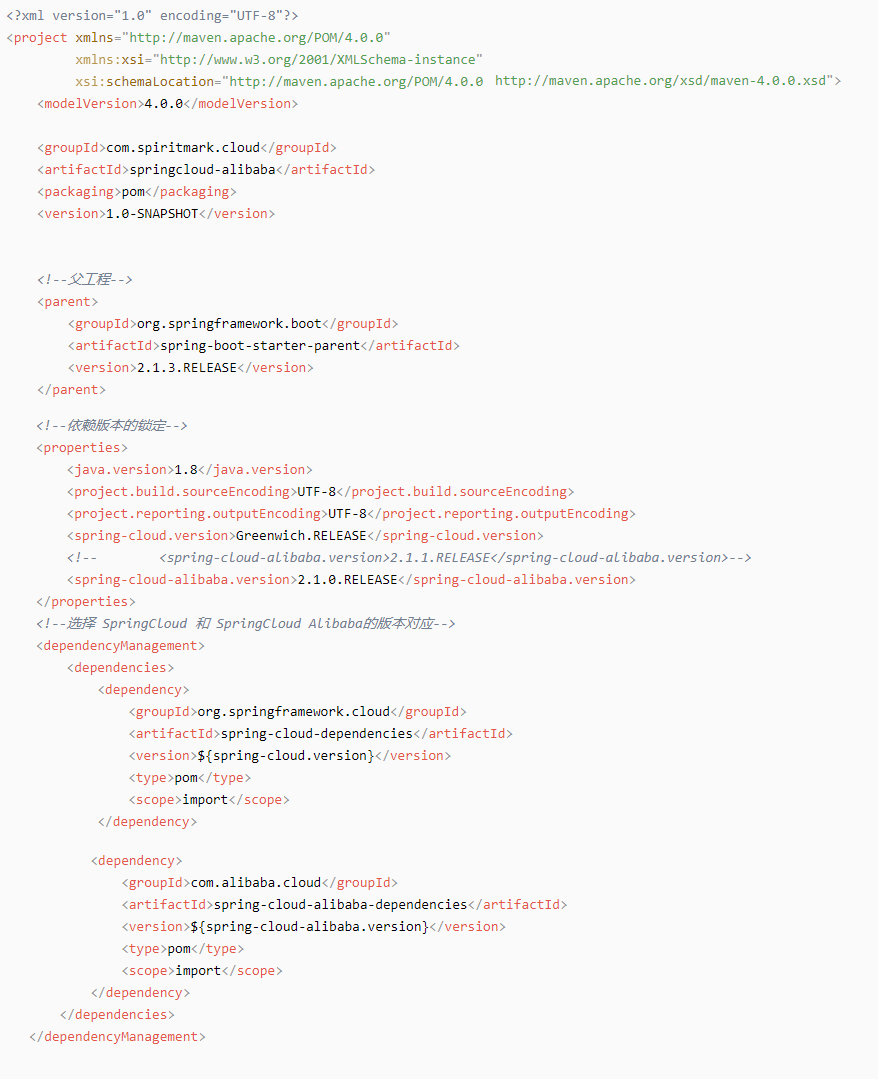
2.2 创建父工程
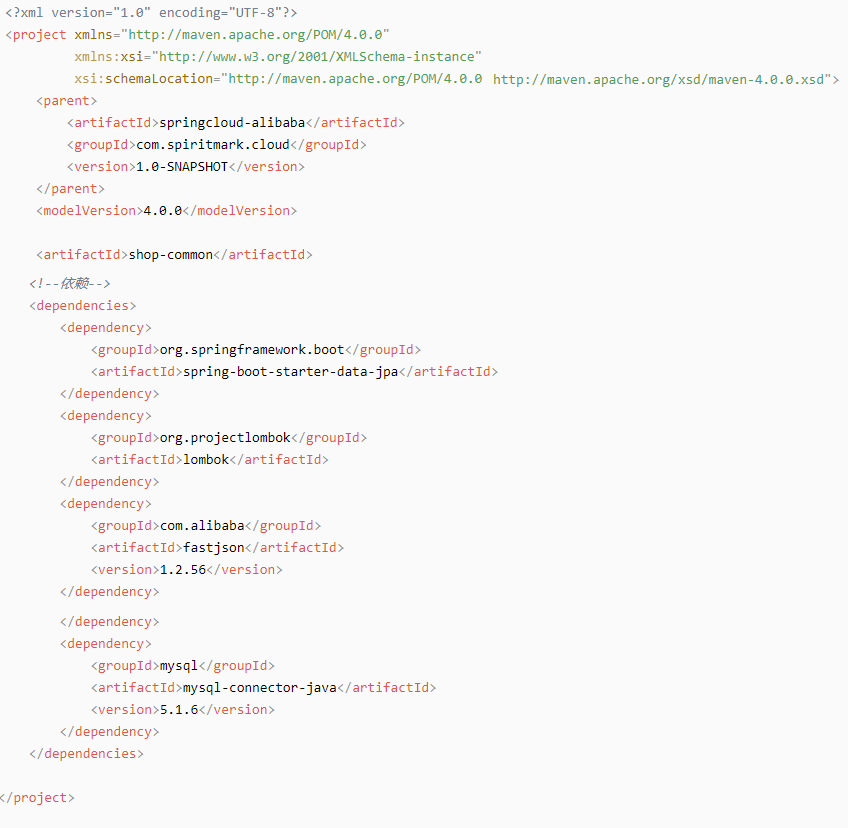
创建一个maven工程,然后在pom.xml文件中添加下面内容
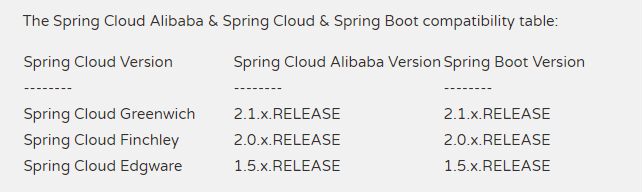
截自 2020 年 1月 7日 版本对应:
2.3 创建基础模块
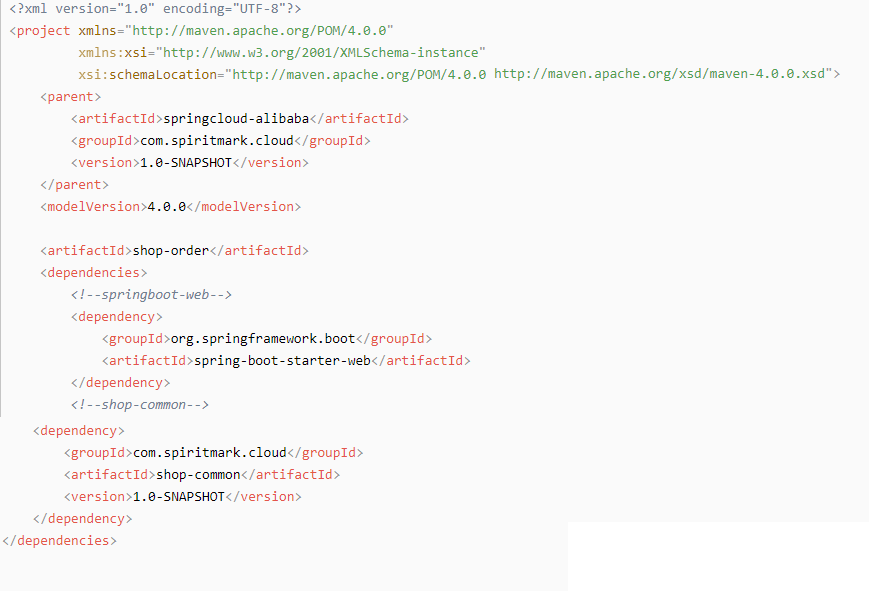
1 创建shop-common 模块,在pom.xml中添加依赖
2 创建实体类
用户类
| import lombok.Data; import javax.persistence.Entity; import javax.persistence.GeneratedValue; import javax.persistence.GenerationType; import javax.persistence.Id; //用户 @Entity(name = “shop_user”)//实体类跟数据表的对应 @Data//不再去写set和get方法 public class User { @Id @GeneratedValue(strategy = GenerationType.IDENTITY)//数据库自增 private Integer uid;//主键 private String username;//用户名 private String password;//密码 private String telephone;//手机号 } |
商品类
| import lombok.Data; import javax.persistence.Entity; import javax.persistence.GeneratedValue; import javax.persistence.GenerationType; import javax.persistence.Id; //商品 @Entity(name = “shop_product”) @Data public class Product { @Id @GeneratedValue(strategy = GenerationType.IDENTITY) private Integer pid;//主键 private String pname;//商品名称 private Double pprice;//商品价格 private Integer stock;//库存 } |
订单类
| import lombok.Data; import javax.persistence.Entity; import javax.persistence.GeneratedValue; import javax.persistence.GenerationType; import javax.persistence.Id; //订单 @Entity(name = “shop_order”) @Data public class Order { @Id @GeneratedValue(strategy = GenerationType.IDENTITY) private Long oid;//订单id //用户 private Integer uid;//用户id private String username;//用户名 //商品 private Integer pid;//商品id private String pname;//商品名称 private Double pprice;//商品单价 //数量 private Integer number;//购买数量 } |
2.4 创建用户微服务
步骤:
1 创建模块 导入依赖
2 创建SpringBoot主类
3 加入配置文件
4 创建必要的接口和实现类(controller service dao)
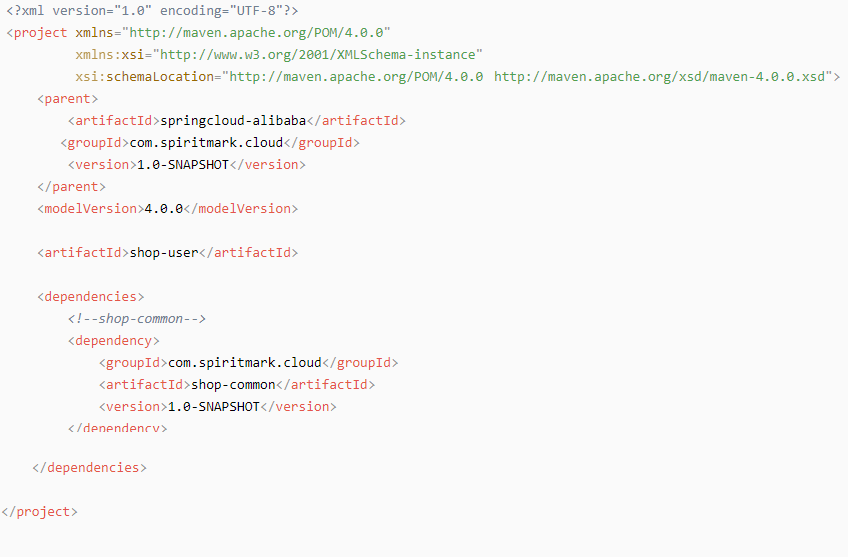
新建一个shop-user 模块,然后进行下面操作
2 编写主类
| @SpringBootApplication @EnableDiscoveryClient public class UserApplication { public static void main(String[] args) { SpringApplication.run(UserApplication.class, args); } } |
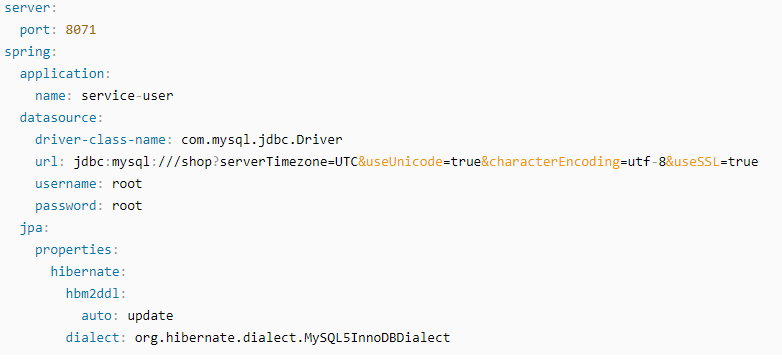
3. 编写配置文件
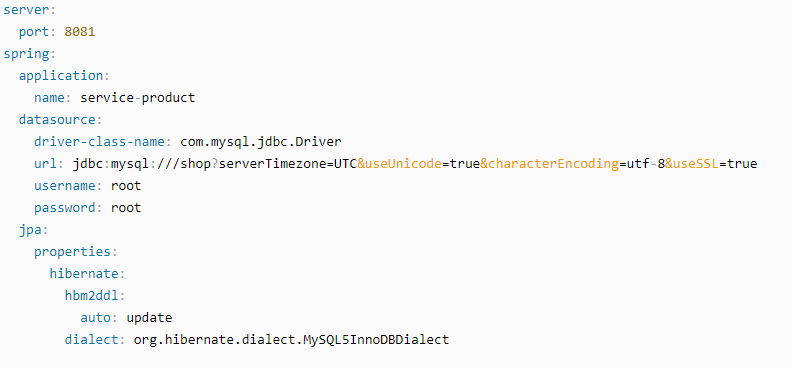
2.5 创建商品微服务
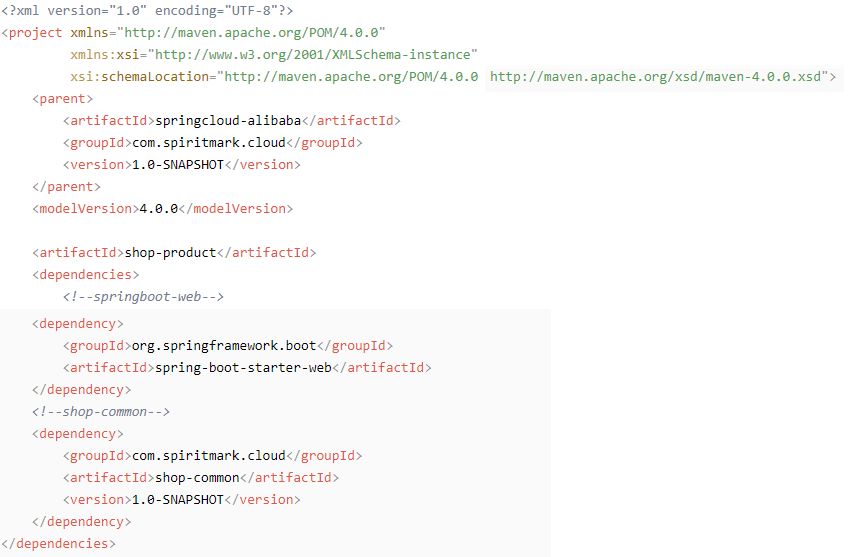
1 创建一个名为shop_product 的模块,并添加springboot依赖
2 创建工程的主类
| @SpringBootApplication public class ProductApplication { public static void main(String[] args) { SpringApplication.run(ProductApplication.class, args); } } |
3 创建配置文件application.yml
4 创建ProductDao接口
| public interface ProductDao extends JpaRepository<Product,Integer> { } |
5 创建ProductService接口和实现类
| @Service public class ProductServiceImpl implements ProductService { @Autowired private ProductDao productDao; @Override public Product findByPid(Integer pid) { return productDao.findById(pid).get(); } } |
6 创建Controller
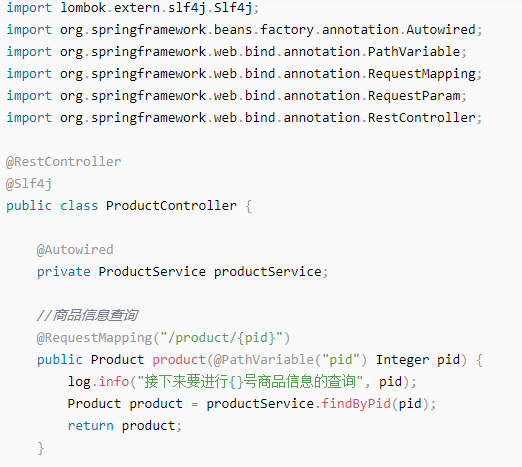
7 启动工程,等到数据库表创建完毕之后,加入测试数据

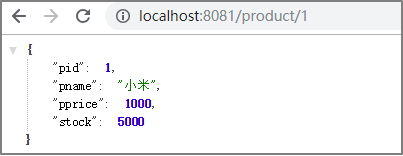
8 通过浏览器访问服务
2.6 创建订单微服务
1 创建一个名为shop-order 的模块,并添加springboot依赖
2 创建工程的主类
| @SpringBootApplication public class OrderApplication { public static void main(String[] args) { SpringApplication.run(OrderApplication.class, args); } } |
3 创建配置文件application.yml
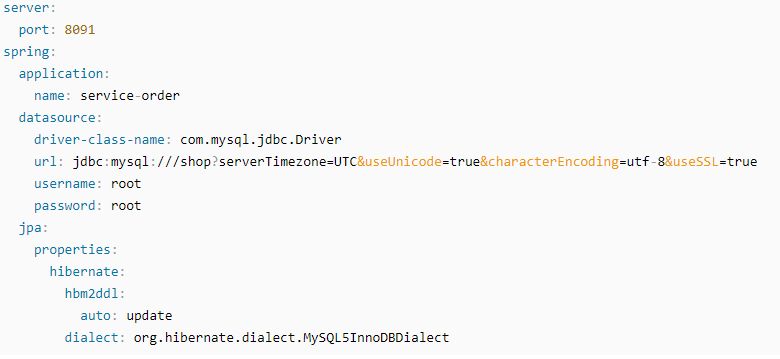
4 创建OrderDao接口
| public interface OrderDao extends JpaRepository<Order,Long> { } |
5 创建OrderService接口和实现类
| @Service public class OrderServiceImpl implements OrderService { @Autowired private OrderDao orderDao; @Override public void save(Order order) { orderDao.save(order); } } |
6 创建RestTemplate
| @SpringBootApplication public class OrderApplication { public static void main(String[] args) { SpringApplication.run(OrderApplication.class, args); } @Bean public RestTemplate getRestTemplate() { return new RestTemplate(); } } |
7 创建Controller
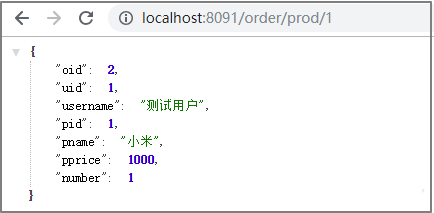
| @RestController @Slf4j public class OrderController { @Autowired private RestTemplate restTemplate; @Autowired private OrderService orderService; //准备买1件商品 @GetMapping(“/order/prod/{pid}”) public Order order(@PathVariable(“pid”) Integer pid) { log.info(“>>客户下单,这时候要调用商品微服务查询商品信息”); //通过restTemplate调用商品微服务 Product product = restTemplate.getForObject( “http://localhost:8081/product/” + pid, Product.class); //通过restTemplate调用商品微服务 Product product = restTemplate.getForObject( “http://localhost:8081/product/” + pid, Product.class); log.info(“>>商品信息,查询结果:” + JSON.toJSONString(product)); Order order = new Order(); order.setUid(1); order.setUsername(“测试用户”); order.setPid(product.getPid()); order.setPname(product.getPname()); order.setPprice(product.getPprice()); order.setNumber(1); orderService.save(order); return order; } |
8 启动工程,通过浏览器访问服务进行测试
SPRINGCLOUD ALIBABA全家桶 目录
第一章 微服务的架构介绍发展
第二章 微服务环境搭建
第三章 Nacos Discovery–服务治理
第四章 Sentinel–服务容错
第五章 Gateway–服务网关
第六章 Sleuth–链路追踪
第七章 Rocketmq–消息驱动
第八章 SMS–短信服务
第九章 Nacos Config–服务配置
第十章 Seata–分布式事务
外一篇 SpringCloud Alibaba——服务注册与发现(Nacos)