使用Istio治理微服务入门
閱讀本文約花費: 20 (分鐘)
近两年微服务架构流行,主流互联网厂商内部都已经微服务化,初创企业虽然技术积淀不行,但也通过各种开源工具拥抱微服务。再加上容器技术赋能,Kubernetes又添了一把火,微服务架构已然成为当前软件架构设计的首选。
但微服务化易弄,服务治理难搞!
一、微服务的“痛点”
微服务化没有统一标准,多数是进行业务领域垂直切分,业务按一定的粒度划分职责,并形成清晰、职责单一的服务接口,这样每一块规划为一个微服务。微服务之间的通信方案相对成熟,开源领域选择较多的有RPC或RESTful API方案,比如:gRPC、Apache Thrift等。这些方案多偏重于数据如何打包、传输与解包,对服务治理的内容涉及甚少。
微服务治理是头疼的事,也是微服务架构中的痛点。治理这个词有多元含义,很难下达一个精确定义,这里可以像小学二年级学生那样列出治理的诸多近义词:管理、控制、规则、掌控、监督、支配、规定、统治等。对于微服务而言,治理体现在以下诸多方面:
服务注册与发现
身份验证与授权
服务的伸缩控制
反向代理与负载均衡
路由控制
流量切换
日志管理
性能度量、监控与调优
分布式跟踪
过载保护
服务降级
服务部署与版本升级策略支持
错误处理
……
从微服务治理角度来说,微服务其实是一个“大系统”,要想将这个大系统全部落地,绝非易事,尤其是之前尚没有一种特别优雅的技术方案。多数方案(比如:Dubbo、go-kit等)都或多或少地对应用逻辑有一定的侵入性,让业务开发人员不能只focus到业务本身,还要关心那些“治理”逻辑。并且市面上内置了微服务治理逻辑的框架较少,且很多编程语言相关。这种情况下,大厂多选择自研或基于某个框架改造,小厂一般只能“东拼西凑”一些“半成品”凑合着使用,就这样微服务也走过了若干年。
二、Service Mesh横空出世,Istio带来“福音”
我不知道在没有TCP/IP协议的年代,主机和主机之间的应用通信时是否需要应用关心底层通信协议实现逻辑。但是和TCP/IP诞生的思想类似,在微服务使用多年后,人们发现需要独立地抽象出一层逻辑网络,专门用于“微服务通信与治理策略的落地”,让应用只关心业务,把服务治理的事情全部交由“这一层”去处理。
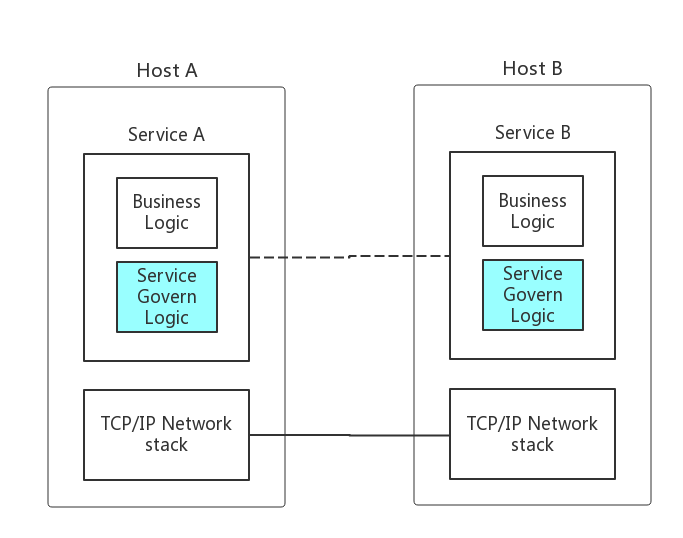
图 1:传统微服务之间的微服务治理逻辑的位置
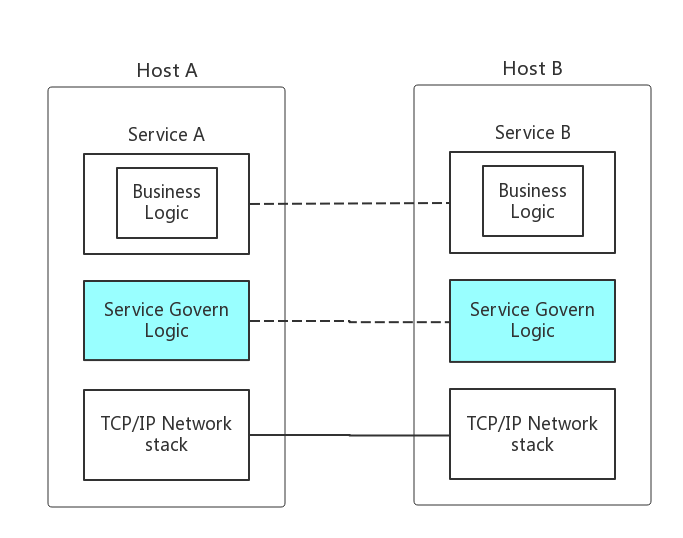
图 2:微服务治理逻辑被独立出来之后的位置
由“Service Govern Logic”这一层组成的逻辑网络被定义为Service Mesh,每个微服务都包含一个service mesh的端点。
“Service Mesh”概念还非常年轻,这个词在国内被翻译为“服务网格”或“服务啮合层”,我们这里就用Service Mesh这个英文词。这里摘录一下ServiceMesh中文社区上的一篇名为《年度盘点2017之Service Mesh:群雄逐鹿烽烟起[1]》的文章中对Service Mesh概念的回顾:在 2016 年年初,“Service Mesh”还只是 Buoyant 公司的内部词汇,而之后,它开始逐步走向社区:2016 年 9 月 29 日在 SF Microservices 上,“Service Mesh”这个词汇第一次在公开场合被使用。这标志着“Service Mesh”这个词,从 Buoyant 公司走向社区。2016 年 10 月,Alex Leong 开始在 Buoyant 公司的官方 Blog 中连载系列文章“A Service Mesh for Kubernetes”。随着“The Services must Mesh”口号的喊出,Buoyant 和 Linkerd 开始 Service Mesh 概念的布道。2017 年 4 月 25 日,William Morgan 发布博文“What’s a Service Mesh? And why do I need one?”。正式给 Service Mesh 做了一个权威定义。而Service Mesh真正引起大家关注要源于Istio项目的开源发布。为什么呢?个人觉得还是因为“爹好”!Istio项目由Google、IBM共同合作创建,Lyft公司贡献了Envoy项目将作为Istio Service Mesh的data panel。Google、IBM的影响力让Service Mesh概念迅速传播,同时也让大家认识到了Istio项目在Service Mesh领域的重要性,于是纷纷选择积极支持并将自己的产品或项目与Istio项目集成。
Istio项目是Service Mesh概念的最新实现,旨在所有主流集群管理平台上提供Service Mesh层,初期以实现Kubernetes上的服务治理层为目标。它由控制平面和数据平面组成(是不是感觉和SDN的设计理念相似啊)。控制平面由Go语言实现,包括Pilot、Mixer、Auth三个组件;数据平面功能暂由Envoy在Pod中以Sidecar的部署形式提供。下面是官方的架构图:
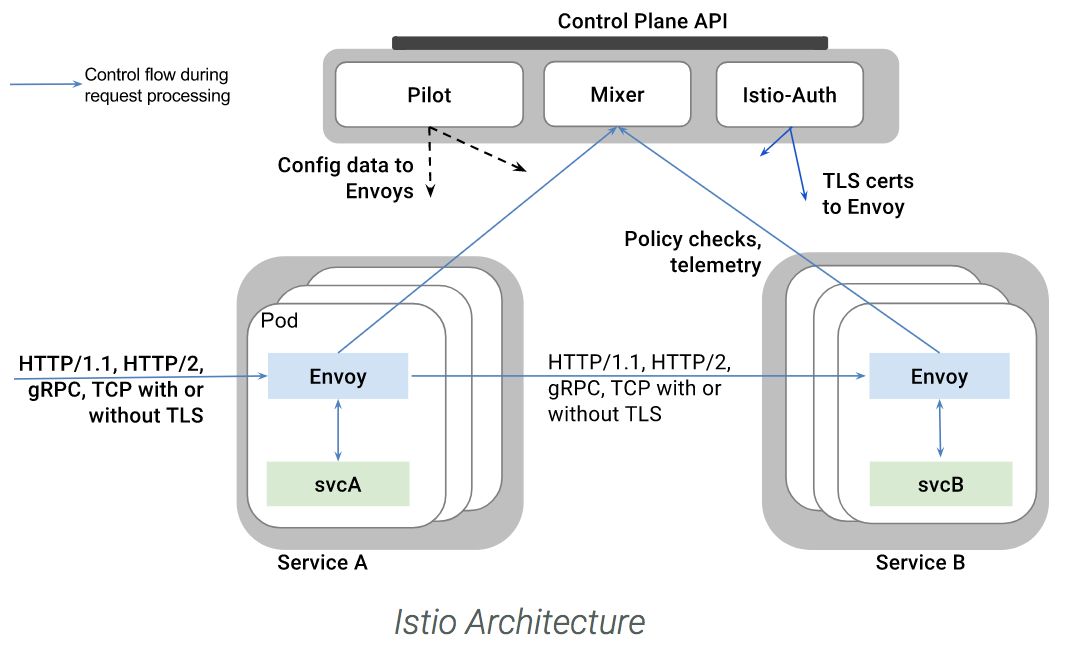
图 3:Istio架构图(来自官网)
Sidecar中Envoy代理了Pod中真正业务Container的所有进出流量,并对这些流量按照控制平面设定的“治理逻辑”进行处理。而这一切对Pod中的业务应用是透明的,开发人员可以专心于业务逻辑,而无需再关心微服务治理的逻辑。Istio代表的Service Mesh的设计理念被认为是下一代“微服务统一框架”,甚至有人认为是微服务框架演化的终点。
Istio于2017年5月24日发布了0.1 release版本,截至目前为止Istio的版本更新到v 0.4.0,演进速度相当快,不过目前依然不要用于生产环境,至少要等到1.0版本发布吧。但对于Istio的早期接纳者而言,现在正是深入研究Istio的好时机。在本篇的接下来内容中,我们将带领大家感性的认识一下Istio,入个门儿。
三、Istio安装
Istio目前支持最好的就是Kubernetes了,因此我们的实验环境就定在Kubernetes上。至于版本,Istio当前最新版本为0.4.0,这个版本据说要Kubernetes 1.7.4及以上版本用起来才不会发生小毛病:)。我的Kubernetes集群是v1.7.6版本的,恰好满足条件。下面是安装过程:(Node上的OS是Ubuntu 16.04)
| # wget -c https://github.com/istio/istio/releases/ download/ 0.4.0/istio-0.4.0-linux.tar.gz 解压后,进入istio-0.4.0目录, # ls -F bin/ install/ istio.VERSION LICENSE README.md samples/ # cat istio.VERSION # DO NOT EDIT THIS FILE MANUALLY instead use # install/updateVersion.sh (see install/README.md) export CA_HUB=”docker.io/istio” export CA_TAG=”0.4.0″ export MIXER_HUB=”docker.io/istio” export MIXER_TAG=”0.4.0″ export PILOT_HUB=”docker.io/istio” export PILOT_TAG=”0.4.0″ export ISTIOCTL_URL=”https://storage.googleapis.com/ istio-release/releases/0.4.0/istioctl” export PROXY_TAG=”0.4.0″ export ISTIO_NAMESPACE=”istio-system” export AUTH_DEBIAN_URL=”https://storage.googleapis.com/ istio-release/releases/0.4.0/deb” export PILOT_DEBIAN_URL=”https://storage.googleapis.com/istio-release/releases/0.4.0/deb” export PROXY_DEBIAN_URL=”https://storage.googleapis.com/istio-release/releases/0.4.0/deb” export FORTIO_HUB=”docker.io/istio” export FORTIO_TAG=”0.4.2″ # cd install/kubernetes 我们先不用auth功能,因此使用istio.yaml这个文件进 行Istio组件安装: # kubectl apply -f istio.yaml namespace “istio-system” created clusterrole “istio-pilot-istio-system” created clusterrole “istio-initializer-istio-system” created clusterrole “istio-mixer-istio-system” created clusterrole “istio-ca-istio-system” created clusterrole “istio-sidecar-istio-system” created clusterrolebinding “istio-pilot-admin-role-binding -istio-system” created clusterrolebinding “istio-initializer-admin-role -binding-istio-system” created clusterrolebinding “istio-ca-role-binding-istio -system” created clusterrolebinding “istio-ingress-admin-role -binding-istio-system” created clusterrolebinding “istio-sidecar-role-binding -istio-system” created clusterrolebinding “istio-mixer-admin-role- binding-istio-system” created configmap “istio-mixer” created service “istio-mixer” created serviceaccount “istio-mixer-service-account” created deployment “istio-mixer” created customresourcedefinition “rules.config.istio. io” created customresourcedefinition “attributemanifests. config.istio.io” created … … customresourcedefinition “reportnothings. config.istio.io” created attributemanifest “istioproxy” created attributemanifest “kubernetes” created stdio “handler” created logentry “accesslog” created rule “stdio” created metric “requestcount” created metric “requestduration” created metric “requestsize” created metric “responsesize” created metric “tcpbytesent” created metric “tcpbytereceived” created prometheus “handler” created rule “promhttp” created rule “promtcp” created kubernetesenv “handler” created rule “kubeattrgenrulerule” created kubernetes “attributes” created configmap “istio” created customresourcedefinition “destinationpolicies.config.istio.io” created customresourcedefinition “egressrules.config. istio.io” created customresourcedefinition “routerules.config. istio.io” created service “istio-pilot” created serviceaccount “istio-pilot-service-account” created deployment “istio-pilot” created service “istio-ingress” created serviceaccount “istio-ingress-service-account” created deployment “istio-ingress” created serviceaccount “istio-ca-service-account” created deployment “istio-ca” created |
注:我还曾在Kubernetes v1.7.3上安装过Istio 0.3.0版本,但在创建组件时会报下面错误(这个错误可能会导致后续addon安装后工作不正常):
| unable to recognize “istio.yaml”: no matches for config.istio.io/, Kind=metric unable to recognize “istio.yaml”: no matches for config.istio.io/, Kind=metric unable to recognize “istio.yaml”: no matches for config.istio.io/, Kind=metric unable to recognize “istio.yaml”: no matches for config.istio.io/, Kind=metric unable to recognize “istio.yaml”: no matches for config.istio.io/, Kind=metric unable to recognize “istio.yaml”: no matches for config.istio.io/, Kind=metric |
安装后,我们在istio-system这个namespace下会看到如下Pod和Service在运行(由于Istio的各个组件的image size都不小,因此Pod状态变为Running需要一丢丢时间,耐心等待):
| # kubectl get pods -n istio-system NAME READY STATUS RESTARTS AGE istio-ca-1363003450-jskp5 1/1 Running 0 3d istio-ingress-1005666339-c7776 1/1 Running 4 3d istio-mixer-465004155-twhxq 3/3 Running 24 3d istio-pilot-1861292947-6v37w 2/2 Running 18 3d # kubectl get svc -n istio-system NAME CLUSTER-IP EXTERNAL-IP PORT(S) AGE istio-ingress 10.98.10.87 <pending> 80:31759/TCP ,443:25804/TCP 4d istio-mixer 10.109.244.155 <none> 9091/TCP,15004/TCP,9093/TCP,9094/TCP,9102/TCP, 9125/UDP,42422/TCP 4d istio-pilot 10.105.80.55 <none> 15003/TCP,443/TCP 4d Istio安装成功! |
四、服务治理策略验证
接下来我们来用几个例子验证一下Istio在服务治理方面的能力!(Istio自带一些完整的例子,比如bookinfo,用于验证服务治理的能力,但这里先不打算用这些例子)
1、验证环境和拓扑
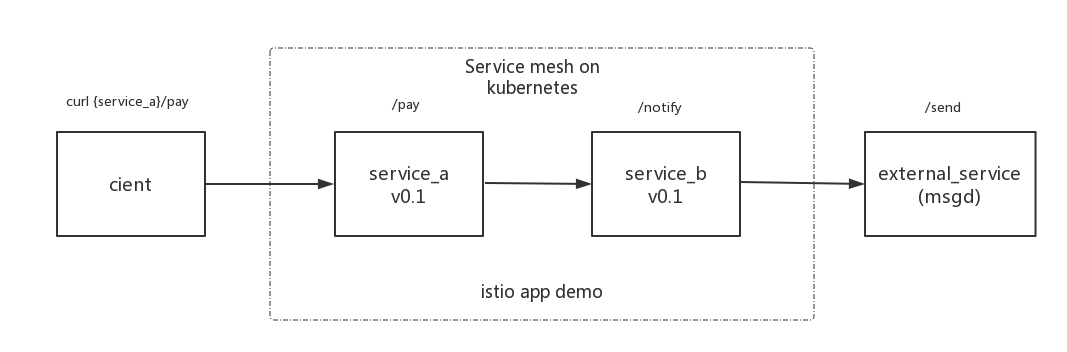
我们先来看一下验证环境的示意图:
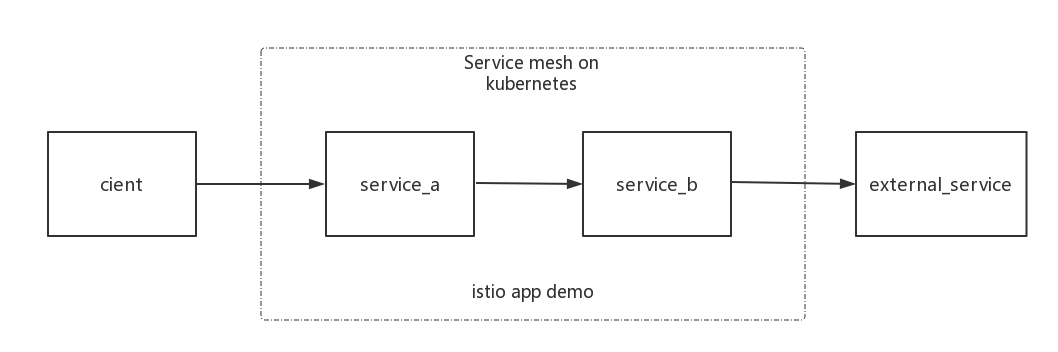
我们看到在Service Mesh中部署了两个service: servera和serviceb,前者调用后者完成某项业务,后者则调用外部服务完成业务逻辑。
servicea:模拟pay服务,在收到client请求后,进行pay处理,并将处理结果通过serviceb提供的msg notify服务下发给user。该服务的endpoint为/pay;
serviceb:模拟notify服务,在收到servicea请求后,将message转发给external service,完成notify逻辑。该服务的endpoint为/notify;
external service:位于Service Mesh之外;
client:我们使用curl模拟。
我们先来部署servicea和serviceb的v0.1版本:
以servicea的部署为例,servicea的deployment文件如下:
| //svca-v0.1.yaml apiVersion: extensions/v1beta1 kind: Deployment metadata: name: svca spec: replicas: 1 template: metadata: labels: app: svca version: v0.1 spec: containers: – name: svca image: docker.io/bigwhite/istio-demo-svca:v0.1 imagePullPolicy: Always — apiVersion: v1 kind: Service metadata: name: svca labels: app: svca spec: ports: – port: 80 targetPort: 8080 protocol: TCP selector: app: svca |
注意,我们部署service_a时不能直接使用kubectl apply -f svca-v0.1.yaml,而是要apply经过istioctl(需将Istio安装目录下的bin放入PATH)处理过的yaml,以注入sidecar容器。当然也可以配置为自动为每个Kubernetes启动的Pod注入sidecar,但我们这里没有使用自动注入。我们执行下面命令:
| # kubectl apply -f <(istioctl kube-inject -f svca-v0.1.yaml) deployment “svca” created service “svca” created # kubectl get pods NAME READY STATUS RESTARTS AGE svca-1997590752-tpwjf 2/2 Running 0 2m |
同样的方法,我们来创建svcb:v0.1:
| # kubectl apply -f <(istioctl kube-inject -f svcb-v0.1.yaml) deployment “svcb” created service “svcb” created |
我们看到Istio向每个Pod中插入一个sidecar container,这个就是前面说的envoy,只不过container名字为istio-proxy。
接下来,我们把那个external service启动起来:
| # nohup ./msgd > 1.log & 2>&1 [1] 9423 |
实验环境OK了。下面我们来验证一下业务是否是通的。
2、Egress Rules
按照之前我们的设定,我们使用curl去访问service_a服务的/pay端点,我们查看一下svca服务的IP和端口:
| # kubectl get svc NAME CLUSTER-IP EXTERNAL-IP PORT(S) svca 10.105.38.238 <none> 80/TCP 9h svcb 10.105.119.194 <none> 80/TCP 9h |
我们访问一下svca服务,svca的服务地址可以通过kubectl get svc查到:
| # curl {svca_ip}/pay |
查看svca和svcb的日志:
| //service_a的日志: service_a:v0.1 is serving the request… service_a:v0.1 pays ok &{500 Internal Server Error 500 HTTP/1.1 1 1 map[X-Content-Type-Options:[nosniff] Date:[Tue, 02 Jan 2018 15:41:50 GMT] Content-Length:[66] Content-Type:[text/plain; charset=utf-8]] 0xc420058d40 66 [] false false map[] 0xc4200eaf00 <nil>} service_a:v0.1 notify customer ok // service_b的日志: &{GET /notify?msg=service_a:v0.1-pays-ok HTTP/1.1 1 1 map[User-Agent:[Go-http-client/1.1] Accept-Encoding:[gzip]] {} <nil> 0 [] false svcb map[] map[] <nil> map[] 127.0.0.1:58778 /notify?msg=service_a:v0.1-pays-ok <nil> <nil> <nil> 0xc4200fa3c0} service_b:v0.1 is serving the request… service_b:v0.1 send msg error: Get http://10.100.35.27:9997/send?msg=service_a:v0.1-pays-ok: EOF |
我们看到servicea和serviceb都返回了错误日志(注意:go http get方法对于non-2xx response不会返回错误,我们只是看到了response中的500状态码才意识到错误的存在)。其中源头在service_b,原因是其连不上那个external service!那么为什么连不上external service呢?这是由于缺省情况下,启用了Istio的服务是无法访问外部URL的,这是因为Pod中的iptables把所有外发传输都转向到了Sidecar代理,而这一代理只处理集群内的访问目标。因此位于Service Mesh内的服务svcb无法访问外部的服务(msgd),我们需要显式的添加egressrule规则:
我们创建一个允许svcb访问外部特定服务的EgressRule:
| //rules/enable-svcb-engress-rule.yaml apiVersion: config.istio.io/v1alpha2 kind: EgressRule metadata: name: enable-svcb-engress-rule spec: destination: service: 10.100.35.27 ports: – port: 9997 protocol: http |
使规则生效:
| # istioctl create -f enable-svcb-engress-rule.yaml Created config egress-rule/default/enable-svcb-engress-rule at revision 30031258 |
这时你再尝试curl svca,我们可以看到msgd的日志中出现了下面的内容:
| 2018/01/02 23:58:16 &{GET /send?msg=service_a:v0.1- pays-ok HTTP/1.1 1 1 map[X-Ot-Span-Context:[2157e7ffb8105330;2157e7ffb8105330;00000000 00000000] Content-Length:[0] User-Agent:[Go-http-client/1.1] X- Forwarded-Proto:[http] X-Request-Id:[13c3af6e-2f52-993d-905f-aa 6aa4b57e2d] X-Envoy-Decorator-Operation:[default-route] X-B3- Spanid:[2157e7ffb8105330] X-B3-Sampled:[1] Accept- Encoding: [gzip] X-B3-Traceid:[2157e7ffb8105330] X-Istio-Attributes: [Ch8KCXNvdXJjZS5pcBISMhAAAAAAAAAAAAAA//8KLgAMCjo KCnNvdXJjZS51aWQSLBIqa3ViZXJuZXRlczovL3N2Y2ItMjAwO Dk3Mzc2OS 1ncTBsaC5kZWZhdWx0]] {} <nil> 0 [] false 10.100.35. 27:9997 map[] map[] <nil> map[] 10.100.35.28:38188 /send?msg=service _a:v0.1-pays-ok <nil> <nil> <nil> 0xc4200584c0} 2018/01/02 23:58:16 Msgd is serving the request… 2018/01/02 23:58:16 Msgd recv msg ok, msg= service_a:v0.1-pays-ok |
说明Svcb到外部服务的通信被打通了!
3、迁移流量到新版本svcb:v0.2
我们经常有这样的需求,当svcb运行一段时间后,svcb添加了新feature,版本要升级到v0.2了,这时我们会部署svcb:v0.2,并将流量逐步切到v0.2上。
我们先来部署一下svcb:v0.2:
| // svcb-v0.2.yaml apiVersion: extensions/v1beta1 kind: Deployment metadata: name: svcb-v0.2 spec: replicas: 1 template: metadata: labels: app: svcb version: v0.2 spec: containers: – name: svcb image: docker.io/bigwhite/istio-demo-svcb:v0.2 imagePullPolicy: Always |
我们可以看到,服务名不变,但版本的label变成了v0.2,我们来执行这次部署:
| # kubectl apply -f <(istioctl kube-inject -f svcb-v0.2.yaml) deployment “svcb-v0.2” created # kubectl get pods NAME READY STATUS RESTARTS AGE svca-1997590752-pq9zg 2/2 Running 0 9h svcb-2008973769-gq0lh 2/2 Running 0 9h svcb-v0.2-3233505404-0g55w 2/2 Running 0 1m svcb服务下又增加了一个endpoint: |
svcb服务下又增加了一个endpoint:
| # kubectl describe svc/svcb …. … Selector: app=svcb Type: ClusterIP IP: 10.105.119.194 Port: <unset> 80/TCP Endpoints: 10.40.0.28:8080,10.46.0.12:8080 … … |
此时,如果按照Kubernetes的调度方式,v0.1和v0.2版本的两个svcb pod应该1:1均衡地承载流量。为了方便查看流量分布,我们将每个版本的svcb的pod副本数量都扩展为2个(replicas: 2),这样Service Mesh中一共会有4个 svcb endpoints。
通过curl访问svca注入流量后,我们发现流量都集中在一个svcb:v0.2的pod上,并且长时间没有变化。我们通过下面的route rule规则来尝试将流量在svcb:v0.1和svcb:v0.2之间1:1均衡:
| // route-rules-svcb-v0.2-50.yaml apiVersion: config.istio.io/v1alpha2 kind: RouteRule metadata: name: route-rules-svcb spec: destination: name: svcb precedence: 1 route: – labels: version: v0.1 weight: 50 – labels: version: v0.2 weight: 50 # istioctl create -f route-rules-svcb-v0.2-50.yaml Created config route-rule/default/route-rules-svcb at revision 30080638 |
按照Istio文档中的说法,这个规则的生效需要一些时间。之后我们注入流量,发现流量切换到svcb:v0.1的一个Pod上去了,并且很长一段时间不曾变化,未均衡到svcb:v0.2上去。
我们更新一下route rule,将流量全部切到svcb:v0.2上去:
| //route-rules-svcb-v0.2-100.yaml apiVersion: config.istio.io/v1alpha2 kind: RouteRule metadata: name: route-rules-svcb spec: destination: name: svcb precedence: 1 route: – labels: version: v0.2 weight: 100 # istioctl replace -f route-rules-svcb-v0.2-100.yaml Updated config route-rule/default/route-rules-svcb to revision 30082944 |
我们用Istio的replace命令更新了规则:route-rules-svcb。更新后,再次注入流量,这回流量重新集中在svcb:v0.2的一个Pod上了,再过一段时间另外一个svcb:v0.2的pod上才有了一些流量。但svcb:v0.1上不再有流量,这个切换是成功的。
在Kubernetes的Service的负载均衡中,Kubernetes就利用了iptables的概率转发(random –probability 0.5),因此这种流量均衡并非是精确的,只有在长时间大量流量经过后,才能看到流量的分布与设定的权重是相似的,可能Istio也是如此,这里仅是入门,就不深入挖掘了。
当然Istio在路由规则设施方面的“能耐”远不止上面例子中所展示的那样,如果要悉数列出,那本文的长度可是要爆掉了。有兴趣的朋友可以去翻看官方文档。
五、插件安装
Istio的强大微服务治理能力还体现在其集成了Grafana、Prometheus、ServiceGraph、Zipkin等Addons,应用程序无需做任何改动,就可以具有数据收集、度量与可视化的监控能力、服务的分布式跟踪能力等。我们可以在Istio的安装包中找到这些Addons的安装文件,我们来逐一试试。
1、Prometheus & Grafana
我们先来安装一下Prometheus和Grafana插件(位于istio-0.4.0/install/kubernetes/addon下面):
| # kubectl apply -f prometheus.yaml configmap “prometheus” created service “prometheus” created deployment “prometheus” created # kubectl apply -f grafana.yaml service “grafana” created deployment “grafana” created # kubectl get pods -n istio-system NAME READY STATUS RESTARTS AGE grafana-3617079618-zpglx 1/1 Running 0 5m prometheus-168775884-ppfxr 1/1 Running 0 5m … … # kubectl get svc -n istio-system NAME CLUSTER-IP EXTERNAL-IP PORT(S) AGE grafana 10.105.21.25 <none> 3000/TCP 16m prometheus 10.103.160.37 <none> 9090/TCP 16m … … |
浏览器中输入Prometheus的服务地址http://10.103.160.37:9090,访问Prometheus:
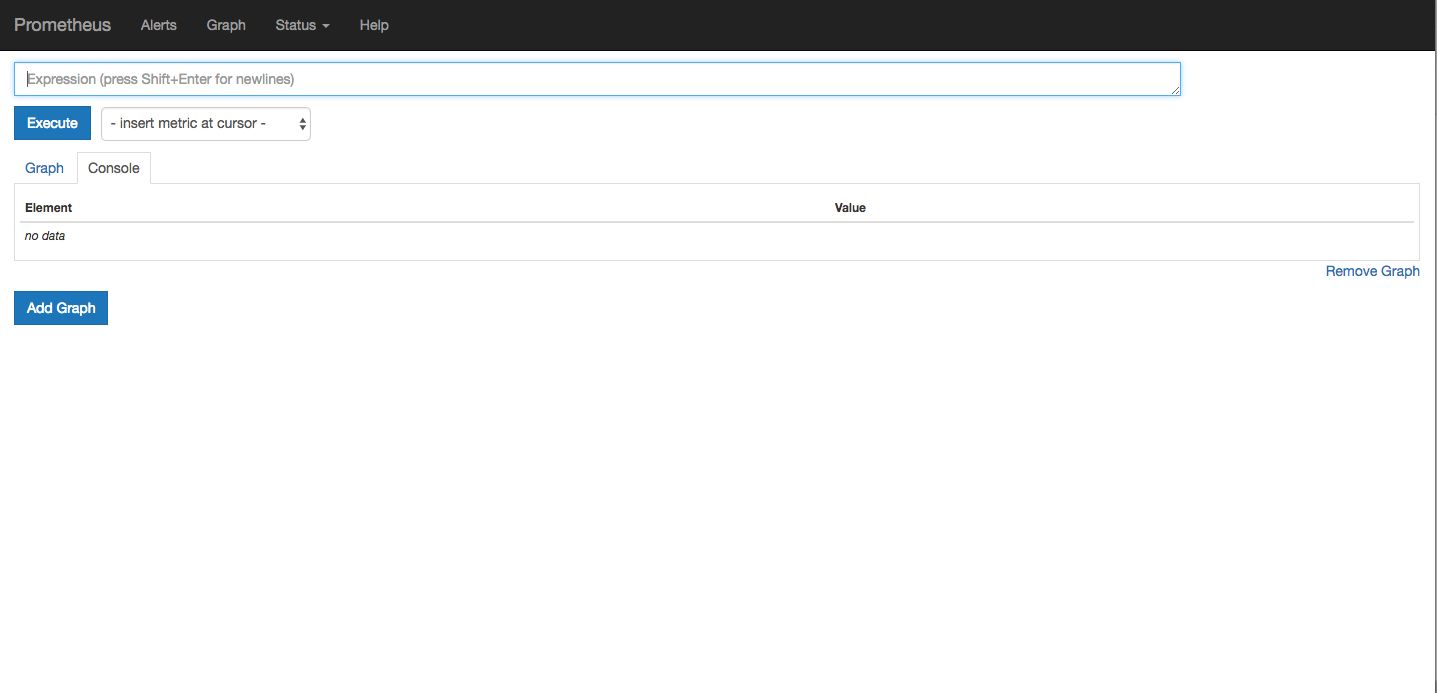
点击菜单项:status -> targets,查看各个target的状态是否正常:

如果像上图所示那样,各个target都是up状态,那就说明Istio运行时OK的。否则请参考istio troubleshooting中的内容对Istio逐一进行排查,尤其是istio-mesh这个Target在istio-0.3.0+kubernetes 1.7.3的环境中就是Down的状态。
浏览器输入grafana的服务地址:http://10.105.21.25:3000/,打开grafana面板:
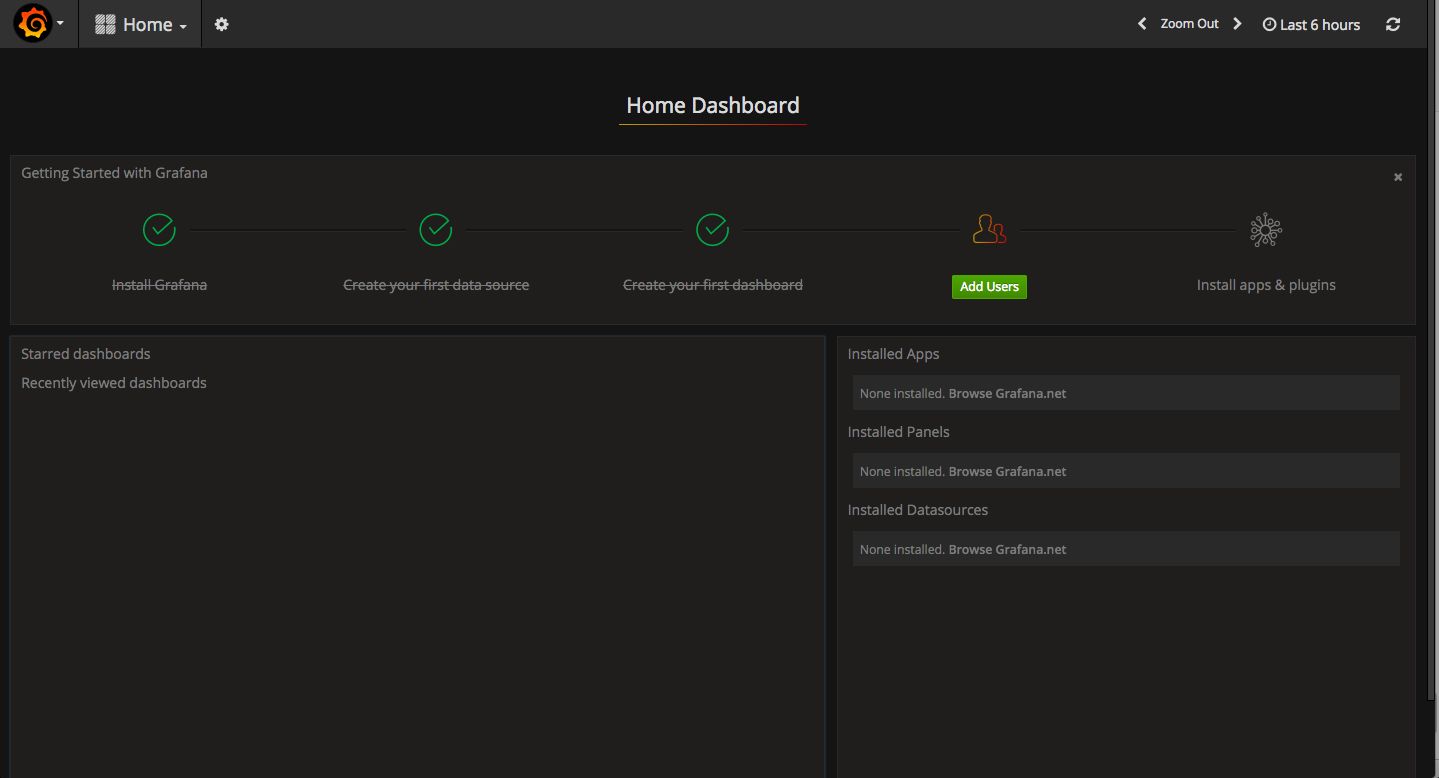
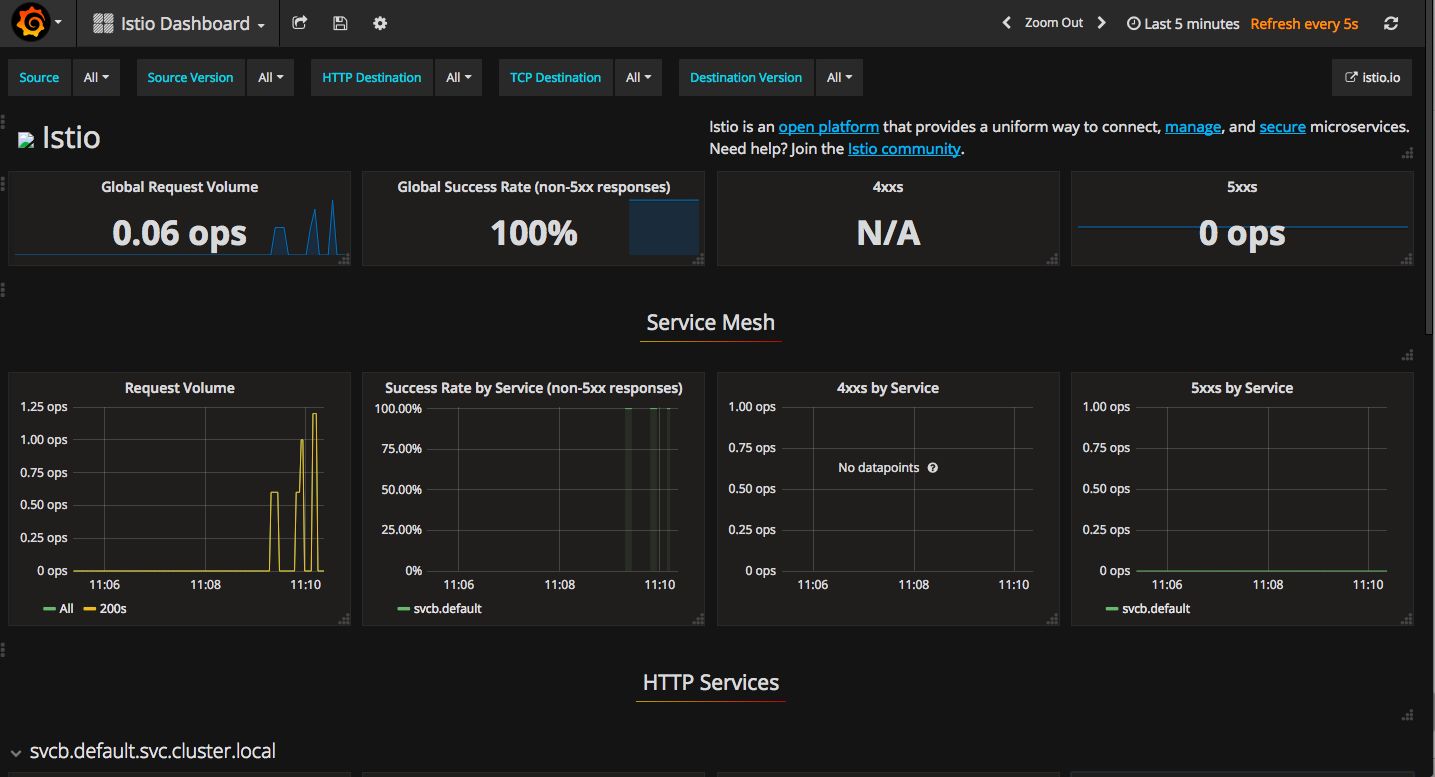
切换到Istio Dashboard,并向Istio Service Mesh注入流量,我们会看到仪表盘变化如下:

2、ServiceGraph
ServiceGraph插件是用来查看服务调用关系的,我们来创建一下该组件:
| # kubectl apply -f servicegraph.yaml deployment “servicegraph” created service “servicegraph” created # kubectl get svc -n istio-system NAME CLUSTER-IP EXTERNAL-IP PORT(S) AGE servicegraph 10.108.245.21 <none> 8088/TCP 52s … … |
创建成功后,向Service Mesh网络注入流量,然后访问ServiceGraph:http://{servicegraph_ip}:8088/dotviz,在我的环境里,我看到的图示如下:
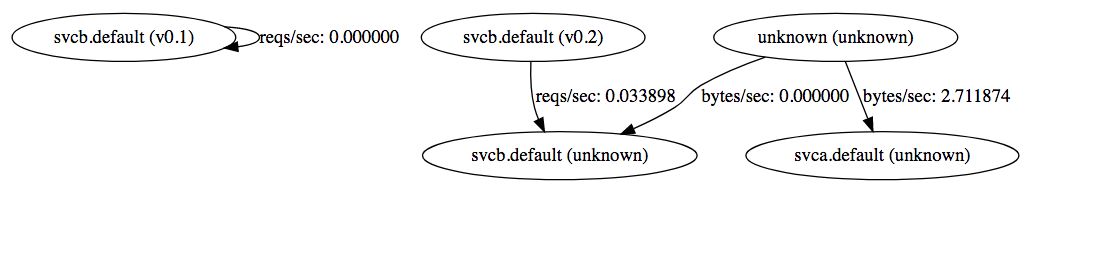
调用关系似乎有些乱,难道是我在程序使用的调用方法不够标准?:(
3、Zipkin
Istio集成了Zipkin,利用Zipkin我们可以做分布式服务调用的追踪。之前自己曾经搭建过基于Jaeger和OpenTracing的分布式调用服务,十分繁琐。并且要想使用tracing,对应用代码的侵入必不可少。
我们安装一下Zipkin Addon:
| # kubectl apply -f zipkin.yaml deployment “zipkin” created service “zipkin” created # kubectl get svc -n istio-system NAME CLUSTER-IP EXTERNAL-IP PORT(S) AGE zipkin 10.105.7.219 <none> 9411/TCP 1h |
我们访问以下Zikpin的UI,通过浏览器打开http://{zipkinserviceip}:9411。

接下来,我们向Service Mesh注入一些流量,然后在Zipkin首页的“服务名”下拉框中选择”svcb”,查找跟踪情况:
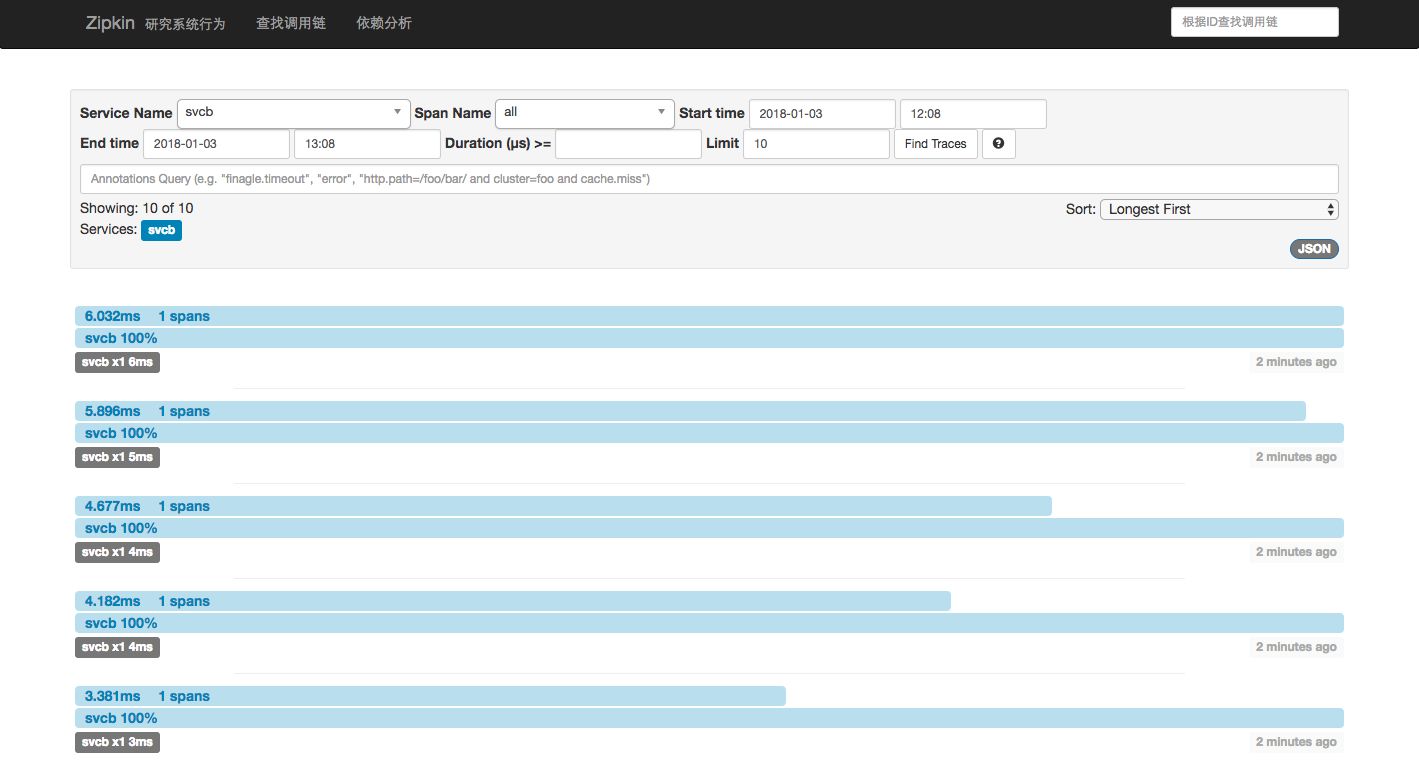
我们看到:在没有对svca,svcb做任何修改的情况下,我们依然可以在Zipkin中找到svcb相关的调用。点击其中一个trace,可以查看细节:
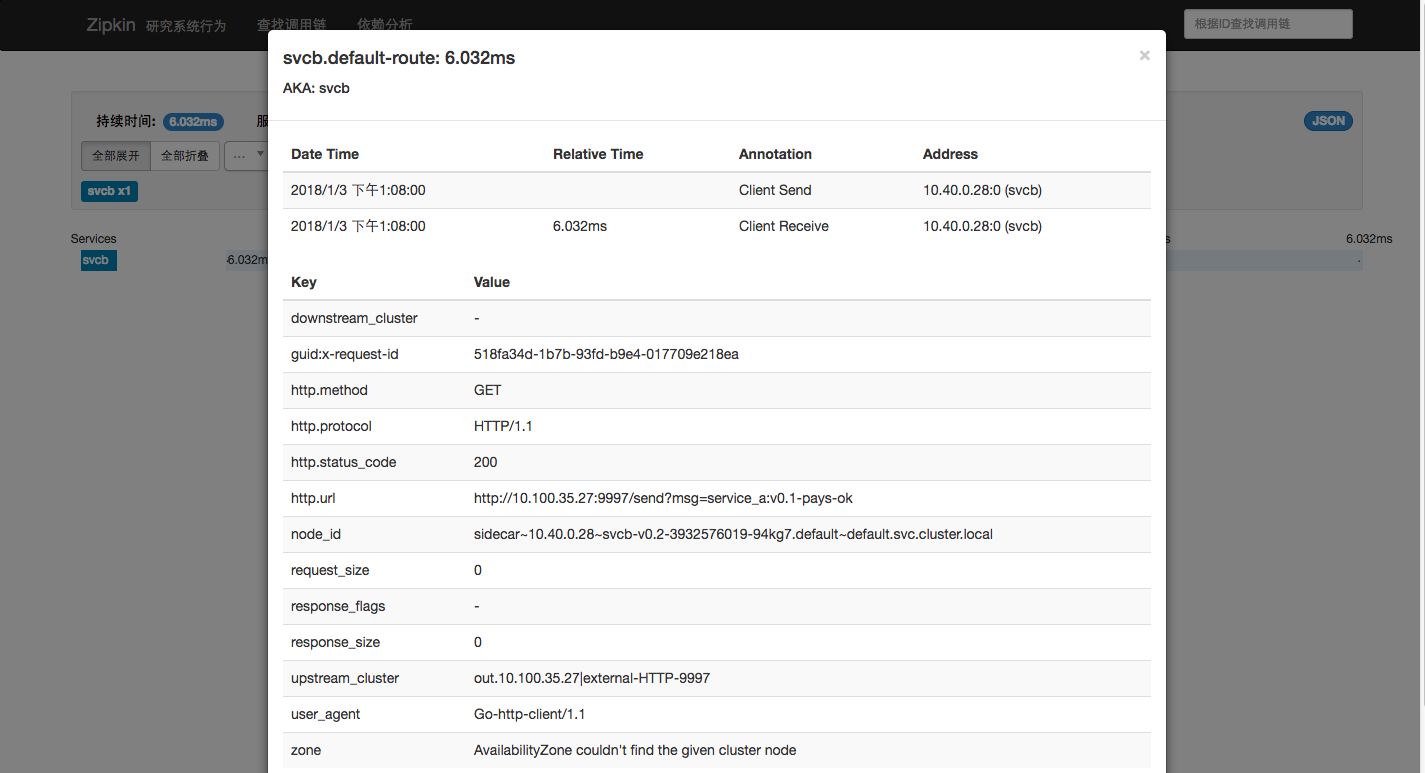
当然如果你想做内容更为丰富的、更为强大的跟踪,可能需要在应用代码中做些配合。